On my other website, I frequently download photos from Unsplash for the header images. As the originals are enormous and high resolution, I needed a way to easily convert them to the correct format.
In this tutorial, I’ll show you how to create an automated workflow with Hazel and ImageMagick that monitors a folder for images from Unsplash, optimises and resizes them, then archives the original file.
If you’re unfamiliar with ImageMagick, you might find my previous blog post useful.
Prerequisites
Step 1: Install ImageMagick
Open Terminal and run:
brew install imagemagick
This installs the magick command-line tool, which handles the format conversion and resizing.
Step 2: Create the Hazel Rule
In Hazel, you need to specify the conditions and the actions.
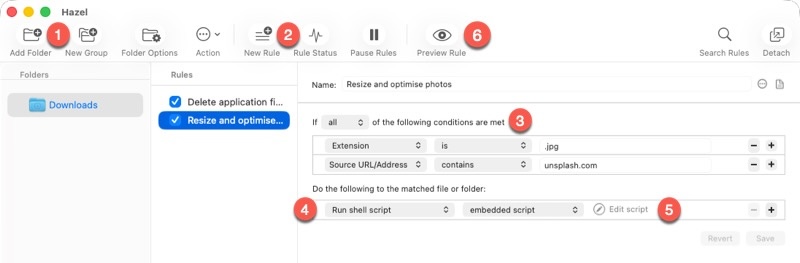
- Click Add Folder, then choose the folder you want to monitor. In this case it’s
Downloads, where I save the photos I want to use on my website. - Click New Rule and give it a descriptive name, e.g. “Resize and optimise photos”.
- Specify the conditions. Here, I’m stipulating that the rule applies only to files with a
.jpgextension that I’ve downloaded from Unsplash.com. This way, I’m unlikely to accidentally apply the rule to the wrong image and I also avoid having to create a separate folder and remember to save photos to it. - Specify the actions as Run shell script. As I’m using ImageMagick, which is a command-line tool, I need to include an embedded shell script. Hazel executes this script every time it spots an image matching those conditions.
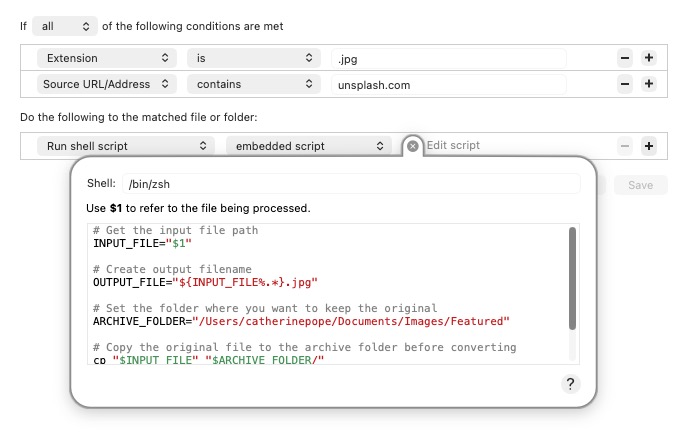
- Click Edit script and create or paste your script. Here’s my script, which you can adapt:
# Get the input file path
INPUT_FILE="$1"

# Create output filename
OUTPUT_FILE="${INPUT_FILE%.*}.jpg"

# Set the folder where you want to keep the original
ARCHIVE_FOLDER="/Users/catherinepope/Documents/Images/Featured"

# Copy the original file to the archive folder before converting
cp "$INPUT_FILE" "$ARCHIVE_FOLDER/"

# Convert to JPG, resize to 1200, set quality to 80%
magick "$INPUT_FILE" -resize 1200 -quality 80 "$OUTPUT_FILE"
For further options, consult the ImageMagick documentation.
⚠️ Test the script on non-critical images!
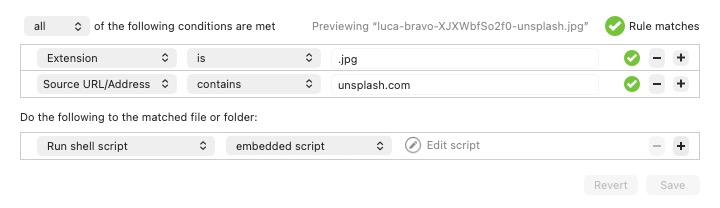
- Click Preview Rule to check whether it’s working. Hazel opens the monitored folder and prompts you to select a file that meets the criteria. You’ll see green ticks if the rule has worked. If not, go back and double-check those criteria. Otherwise, click Preview Rule again, then Save, and your rule is live.
Step 3: Test the Rule
It’s a good idea to test the rule with a few different images, just in case there are any blips or outliers. Here’s my test plan:
Download a photo from Unsplash.com and confirm that:
- The
.jpgfile is now 1200px wide. - The
.jpgfile size is now significantly smaller. - The original
.jpgfile has been saved to myImagesfolder in case I need it again.
Conclusion
This is a very simple example, but hopefully it gives you an idea of how it could work for you. And even simple rules can save a lot of time with repeated actions.
You might notice in my screenshot that I also have a Hazel rule for deleting application files. This deletes any files with a .dmg extension after they’ve been lurking in my Downloads folder for longer than 24 hours. That way, they don’t clutter up my hard drive.
Thank you to the developers of ImageMagick and Hazel for making life a little bit easier 🙏🏼