So far in this series, we’ve created some very simple Kubernetes applications. If you built something more complicated, with dozens of manifests, it would be a faff to share it with other people. Those other people might also struggle to understand and tweak your configuration.
With a Helm Chart, you can define, install, and upgrade even the most complex Kubernetes application. For instance, I worked for a CI/CD company which offered a self-hosted Kubernetes-based version of its product. Rather than having to create lots of different Kubernetes resources, customers instead received a Helm Chart with everything already mapped out - all the Deployments, Secrets, Users, and ConfigMaps. They then configured some of the values and installed the chart on their own Kubernetes cluster.
In this post, I’ll explain how Helm works and walk you through getting started. You’ll install Helm and a chart for running NGINX locally.
👉 Update (November 2025): This tutorial was originally published in 2022. Helm is now at version 3.18, and the Bitnami installation commands have been updated below to reflect current best practices.
To follow the steps in this tutorial, you’ll need:
- kubectl
- minikube
For guidance on installing these tools, see my earlier blog post.
What is Helm?
Helm is a package manager for Kubernetes. Just as Homebrew is a package manager for macOS, and apt is a package manager for Linux. Helm allows you to bundle up all the files as a chart for your Kubernetes application and share it with others. Like Docker images, you can push Helm Charts to a repository, from where other people can download and use them. You can create both public and private repositories.
What is a Helm Chart?
A Helm Chart is essentially a blueprint for your application. It comprises a collection of YAML files with dynamic values for users to populate.
Here’s a simple example of a Helm Chart for a single Pod:
apiVersion: v1
kind: Pod
metadata:
	name: {{ .Values.name }}
spec:
	containers:
	- name: {{ .Values.container.name }}
	  image: {{ .Values.container.image }}
	  port: {{ .Values.container.port }}
The placeholders are replaced with values from a file called values.yaml:
name: web-app
container:
	name: web-app-container
	image: web-app-image
	port: 9001
This approach allows you to use the same blueprint for different purposes. For example, you might want to recreate the same application in various environments (development, staging, production). You can specify a different values.yaml for each environment, but there’s no need to create separate manifests.
Another core use is for microservices. Rather than create a separate YAML file for all your microservices, you need just one chart and then a values.yaml file for each microservice.
What does a Helm Chart look like?
A Helm Chart is a folder of files. Within the folder, you’ll find:
Chart.yaml- contains metadata about the chart.values.yaml- contains values for for the template filescharts/- a subfolder of chart dependenciestemplates/- a subfolder of the actual template files
This Chart includes everything you need to recreate an app on an existing Kubernetes cluster.
Installing Helm
You can install the Helm CLI from a script or a binary release.
Alternatively, macOS users can install it with Homebrew: brew install helm
And Windows users can use Chocolatey: choco install kubernetes-helm
To ensure Helm is installed properly, type helm version at the prompt.
Starting minikube
Before you can install a Helm chart, you need to have a Kubernetes cluster running. Start minikube with the following command:
minikube start
You should see output showing minikube starting up. Once it’s ready, you can verify it’s running with:
kubectl cluster-info
Now you’re ready to find and install a Helm chart.
Finding Helm Charts
Before you can install a Helm Chart, you need to find one from a reliable source.
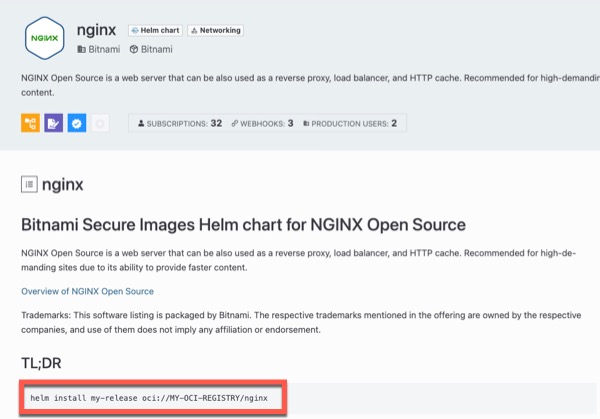
A good place to start is ArtifactHUB. If I search for an NGINX Helm Chart, it returns 318 options. Most are from people or organizations I’ve never heard of. However, the top result is from Bitnami, a reputable company.
I’m using Bitnami for this example, as they offer a lot of useful charts.
Click on the link, and you get more information, including versions and commands. You’ll also see the values you can override to configure your installation.
Helm charts are distributed through OCI (Open Container Initiative) registries - the same type of container registries used for Docker images. In the next section, we’ll install the NGINX chart directly from Bitnami’s registry.
Installing a Helm Chart
Once you’ve identified the chart you want to use, you can install it directly from the OCI registry. For the Bitnami NGINX chart, use the following command:
helm install my-release oci://registry-1.docker.io/bitnamicharts/nginx
The helm install command takes two arguments: the name you want to give your release (or Helm-based application), then the full OCI registry path to the chart.
You’d want to come up with something better than my-release, but hey, it’s a start. Alternatively, you could ask Helm to generate a name. Just add the --generate-name flag. For example:
helm install oci://registry-1.docker.io/bitnamicharts/nginx --generate-name
After running the install command, Helm displays information about your new release, including the name my-release.
There’s also a lot of helpful information in the terminal output. If you skim through it, you’ll find various nuggets of useful information, including instructions on how to access NGINX from within your cluster and from outside the cluster.
The output tells you that NGINX can be accessed through a DNS name from within your cluster:
my-release-nginx.default.svc.cluster.local (port 80)
It also provides commands to access NGINX from outside the cluster by getting the LoadBalancer IP address.
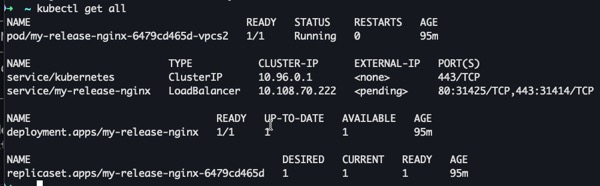
If I run a kubectl get all command, I can see that the Helm Chart has created a Pod, a Deployment, a ReplicaSet, and a Service:
To access the NGINX service from your browser, run:
minikube service my-release-nginx --url
This command returns the URL where NGINX is accessible.

Copy the first URL (the HTTP one) and paste it into your browser. You should see the NGINX welcome page.
All those Kubernetes resources were created with a simple Helm command. And we can make them go away easily, too.
Deleting a Helm Release
Once you’ve finished experimenting with your NGINX installation, you can run another command to remove it:
helm delete my-release
Replace my-release with the name of your release. If you’ve forgotten the name, use the helm list command to see everything that’s running.
You should then see a message confirming that release "my-release" uninstalled.
Then stop minikube with minikube stop.
Conclusion
Admittedly, this isn’t very this isn’t very exciting. Yet.
In my next tutorial, we’ll use Helm to install and configure WordPress locally on minikube. Then you’ll be able to interact with it in your browser.
Until then, Happy Helming.