I’ve been an enthusiastic user of AudioPen for a few years. This brilliant app records and accurately transcribes your voice notes in moments. You can either opt for a light tidy to add punctuation and remove your ums and ahs, or ask it to make you sound like Cicero.
Although you can organise your notes in AudioPen using folders and tags, most of us nerdy types already have a preferred note-taking app. In my case, that’s Obsidian. If you don’t know Obsidian, it’s a powerful yet simple app that stores your notes and plain markdown files and gives you various ways to make connections between them.
In this tutorial, I’ll explain how to deliver your AudioPen notes straight to Obsidian. It’s brilliantly quick and simple, thanks to the AudioPen Sync plugin from Jonas Haefele.
Step 1 - Install the Obsidian Plugin
- In Obsidian, go to Community Plugins and search for AudioPen Sync by Jonas Haefele or use this link.
- Install and enable the plugin.
Step 2 - Sign up for the web service
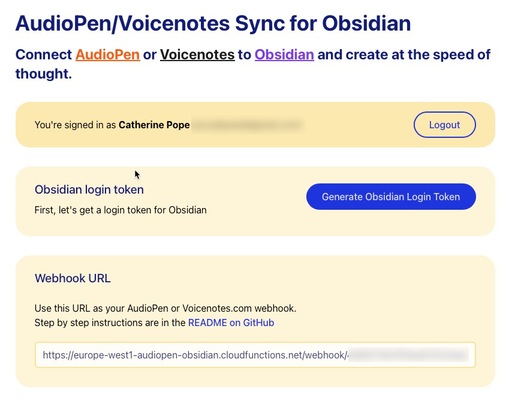
- Go to https://audiopen-obsidian.web.app/ and sign in (you need a Google account).
- Click the blue Generate Obsidian Login Token.
- Copy the token that appears.
Step 3 - Configure Obsidian
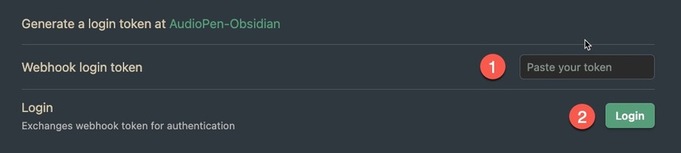
- In Obsidian, open the settings for the AudioPen Sync plugin.
- Paste your token in the box.
- Click Log in.
Obsidian is now connected to the web service.
Step 4 - Configure AudioPen
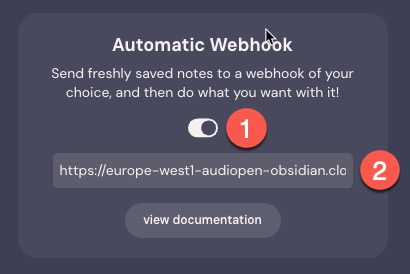
- Go back to https://audiopen-obsidian.web.app/ and copy the webhook URL at the bottom of the page.
- In AudioPen, click the Settings icon in the top right of the screen.
- Under Integrations, click Set up Integrations.
- Under Automatic Webhook, enable the switch, then paste your URL in the box.
AudioPen is now connected to Obsidian through the web service 🎉
🧐 The webhook is essentially a notification system that automatically tells the web service whenever you create a new note in AudioPen. The web service is then triggered to send that note to your Obsidian vault. This all happens automatically, without any manual intervention on your part.
Step 5 - Create a template (optional)
If you need to, you can create templates to control the presentation of your AudioPen notes in Obsidian. For more information and examples, take a look at the GitHub README. For instance, you can decide to include both the original transcript and the cleaned-up version.
Conclusion
Once everything is set up, you should see a tiny green microphone icon in the bottom right-hand corner of Obsidian.

From here, you can check the status, updates the settings, or force a sync. Otherwise, it just syncs happily in the background. This workflow is marvellous for quickly capturing notes wherever you are and instantly delivering them to your desktop.
A big thank you to Jonas Haefele for creating such a useful tool.