One of my main concerns about moving from WordPress to Hugo was, “How on earth do I create a contact form on a static site?”. Fortunately, Netlify came my rescue. Netlify already provides an excellent free service for deploying smaller static sites. I discovered that it also handles forms without the need for any JavaScript or plugins.
In this tutorial, I’ll explain my process for setting up a simple contact form. Submissions are both stored in Netlify and emailed to me. I’m using the Papermod theme for Hugo, so your setup might vary.
Step 1 - Create your form
The bad news is that you have to create your own form, which is challenging if your HTML is rusty. W3C offers a gentle introduction.
Here’s the HTML for my form, which you’re welcome to copy and tweak. I’ve included some commentary below:
| |
- Line 2:
data-netlify="true"- tells Netlify to handle the data submitted through this form.netlify-honeypot="bot-field"- specifies the name of the field used to detect spambots.action="/success/"- on submission, the user is redirected to mysuccess.mdpage, which says “Thank you for your message. I’ll get back to you soon.”
- Lines 4-7: This is the honeypot to catch the spambots. As the text is set to
display: none, it shouldn’t be visible. Anyone using a screenreader hears “Don’t fill this out if you’re human.” - Line 28: As Netlify stores the form data, I explain this in my linked privacy policy.
The form will work without styling, but it won’t look great. You can add CSS to match your site’s design. If you’d find a basic starting point helpful, I’ve uploaded my form CSS as a GitHub gist. It won’t win any prizes, so don’t get excited.
Step 2 - Create a shortcode
Of course, you can’t just dump HTML in a Markdown file. The form needs to live in a shortcode, a chunk of HTML that you can embed in your enquiry page.
I created a shortcode called enquiry-form.html, pasted all the form code above, and saved it to layouts > shortcodes. You don’t need anything else in the shortcode.
Then I called that shortcode from my Contact page (contact.md):
---
title: Contact
permalink: /contact/
hideMeta: true
---

If you'd like to contact me, please use the form below:

{{< enquiry-form >}}
You don’t need to do anything else in Hugo.
Step 3 - Configure Netlify
The final step is to configure Netlify to handle those form submissions.
- Open your Project in Netlify, then click on Forms in the left-hand menu.
- Click Enable form detection.
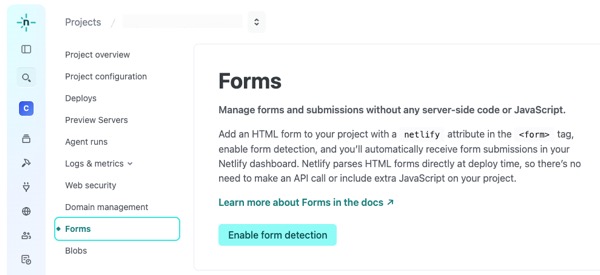
- 👉 Deploy your site, so Netlify detects the special field in your form.
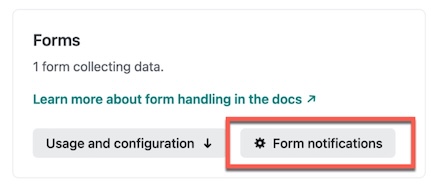
- In the Forms section of Netlify, click Form notifications.
- Add your email address to receive notifications.
Deploy your site and submit a test entry to verify everything’s working.
You’ll find your form submissions under the Active forms section.
Conclusion
I’ve just shown you a very basic form setup. In the Netlify documentation, you’ll find many more options and examples.
On the free plan, you get 100 submissions per month. Given it’s good at filtering out spam, that’s enough for most smaller sites.
If you need something more sophisticated, you could use a third-party solution like Tally. It doesn’t have to be directly integrated with your site. If you’re capturing a lot of information, it’s best to use a product that’s specifically designed for that purpose.
But for most of us, Netlify provides a simple and effective solution.
I’m currently pondering a Getting Started with Hugo online course. Add your email below if you’d be interested, then I’ll let you know if it goes ahead: