Although being a 21st-century researcher has its challenges, we are at least blessed with some excellent tools. Scrivener and Zotero are two of the best. This dream team makes it much easier to plan and draft your writing, then add citations and bibliographies in the right format. Unfortunately, the two tools aren’t directly integrated. This means finding workarounds and making compromises. In a pair of blog posts, I’ll explain two approaches - one simple, one more complicated - so you can decide what’s right for you.
Let’s start simple with the RTF Scan method. With this approach, you use a special citation placeholder with curly braces in Scrivener, then export your project as a RTF (Rich Text Format) file. In Zotero, you use the RTF Scan tool to replace those placeholders with proper citations from your Library.
I’m assuming you already have Zotero and Scrivener installed, and that you have a basic familiarity with both apps. You’ll also need Word or LibreOffice to open the document at the end.
Step 1 - Set Zotero as Scrivener’s Bibliography Manager
Although this step doesn’t achieve proper integration, it enables a keyboard shortcut that summons your Zotero Library while you’re writing. Once you get used the workflow, this reduces the friction significantly.
In your Scrivener Settings, go to the General tab (the first one), then select Citationse from the list on the left.
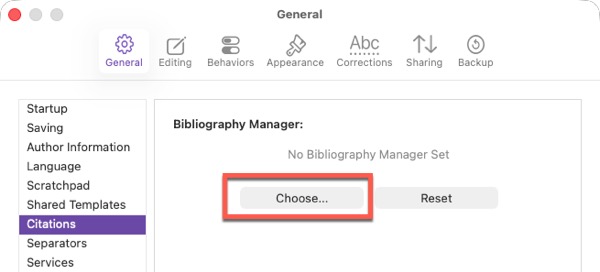
Click Choose, then navigate to wherever Zotero is located on your computer. On a Mac, it’ll be in Applications; on Windows it’s usually something like C:\Program Files (x86)\Zotero. Then click Open.
You should now see Zotero displayed as the Bibliography Manager.
From now on, in Scrivener you can use the Cmd + Y (Mac)1 or Alt + Y (Windows) shortcut to open Zotero while you’re writing 🎉
Step 2 - Install the RTF Scan style in Zotero
You could manually create citations in the RTF Scan format, but you don’t really want to wrangle with curly braces when you’re trying to write something clever. Fortunately, there’s an existing Zotero Style that makes life easier for you.
In your Zotero Settings, go to the Cite section. Under the Style Manager section with the list of styles, click the link to Get additional styles.
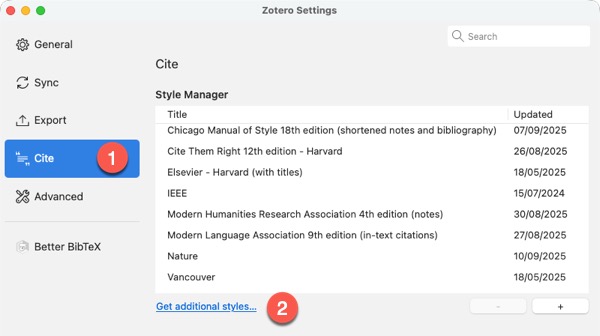
You’ll see a pop-up window with a search box. Type RTF Scan in the box. You should get just one result.
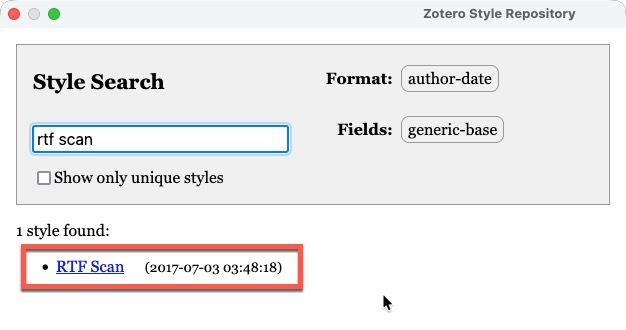
Click on the RTF Scan link and you’ll see it’s been added to your list of styles.
Next, go the the Export section of your Zotero settings. You’ll see a section called Quick Copy. As the instructions explain, this allows you to specify a format for copying individual citations. This doesn’t affect the format you use in Word.
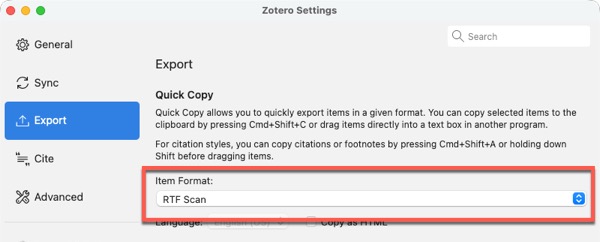
Under Item Format, choose the RTF Scan style you just added.
Scrivener and Zotero are now linked, and you’ve added a style that helps them understand each other better. You’re ready to start creating some citations in Scrivener 🙌
Step 3 - Add your Zotero citations in Scrivener
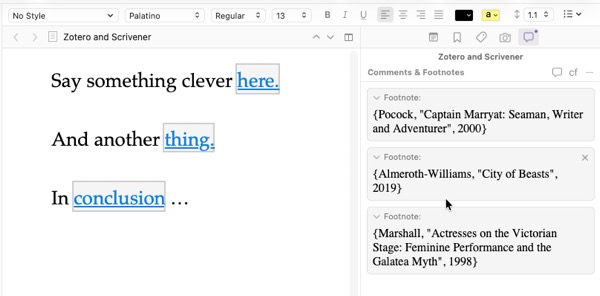
In Scrivener, insert a footnote2 at the end of a sentence. You can use the keyboard shortcut of Cmd + Ctrl + 8 (Mac) or Shift + F5 (Windows) or Insert > Footnote.
Now use the keyboard shortcut to open your Zotero Library (Cmd + Y on a Mac; Alt + Y on Windows). Find and select the item you want to cite, then use the Cmd + Shift + C (Mac) Ctrl + Shift + C (Windows) keyboard shortcut to copy it to your clipboard. As you’ve set RTF Scan as your Quick Copy style, it’ll be in the correct format.
Paste your citation into that Scrivener footnote. You’ll see the curly braces.
🤨 If you don’t see curly braces, or it looks like a normal citation, review Step 2 to ensure you’ve installed the RTF Scan style and set it as the Quick Copy default.
To include a page number, insert a comma before the closing curly brace, then type the number. For example, this is page 3:
{Beller et al., "Rediscovering Victorian Women Sensation Writers", 2014, 3}
Repeat this process for a few more citations. It might feel cumbersome at first, but you’ll soon achieve an impressive momentum. Once everything is installed and configured, the workflow is:
- Insert a footnote in Scrivener - Cmd + Ctrl + 8 (Mac) or Shift + F5 (Windows).
- Open Zotero - Cmd + Y (Mac) Alt + Y (Windows).
- Select the item in your Zotero Library and copy it - Cmd + Shift + C (Mac) Ctrl + Shift + C (Windows).
- Paste the item into your Scrivener footnote.
- Add the page number.
Step 4 - Export your Scrivener document
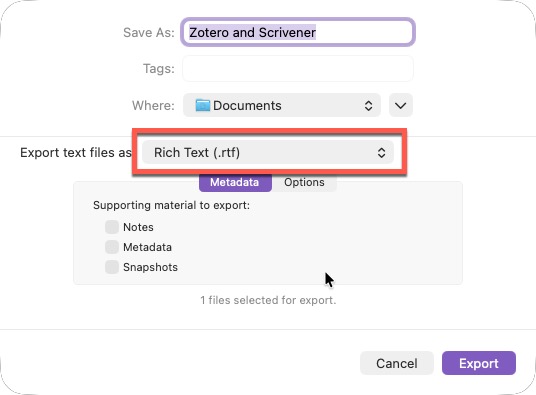
Next you need to export your Scrivener project as an RTF file. Usually, exporting from Scrivener is the stuff of nightmares, but this example is straightforward.
On a Mac, use the keyboard shortcut Cmd + Shift + E; on Windows it’s Ctrl + Shift + X. Or you can go to File > Export > Files.
Make sure Rich Text (.rtf) is selected. Also ensure you haven’t opted to strip footnotes. Then click Export.
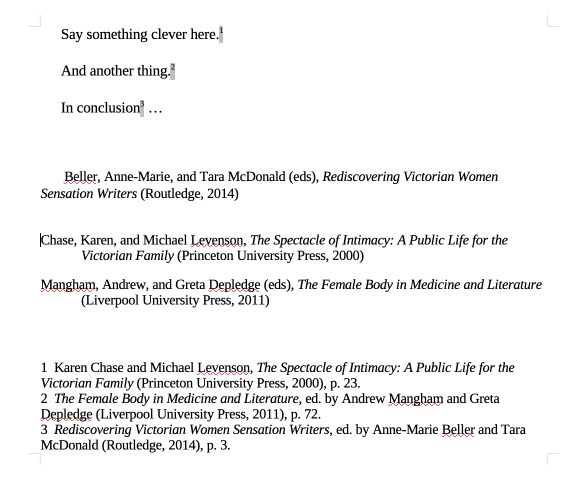
Take a look at your document to make sure you’ve got those citations in curly braces.
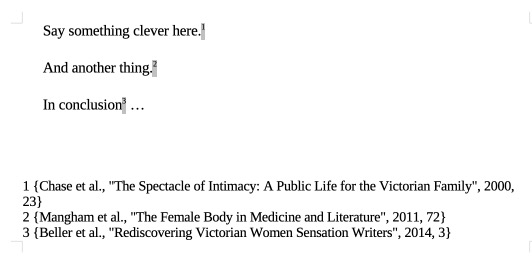
I’ve deliberately made the footnotes shouty here so you can see the format. Zotero needs those curly braces for the final step. Almost there!
Step 5 - Run RTF Scan in Zotero
Now you’re going to open that document in Zotero so it can replace those curly-braced placeholders with proper citations.
In Zotero, click Tools > RTF Scan.
The pop-up box asks you for an Input File and an Output File.
Under Input File, select the file you just exported from Scrivener.
Under Output File, select a destination. Zotero usually suggests a filename with (Scanned) in it. This means you’re not overwriting your original file.
Click Continue.
Zotero lists any citations it has recognised in your document under Mapped Citations. If any are unmapped or ambiguous, click on the tiny icon to the right of the citation to link it to the correct item in your Zotero Library. Unmapped Citations often occur if there are duplicates in your library.
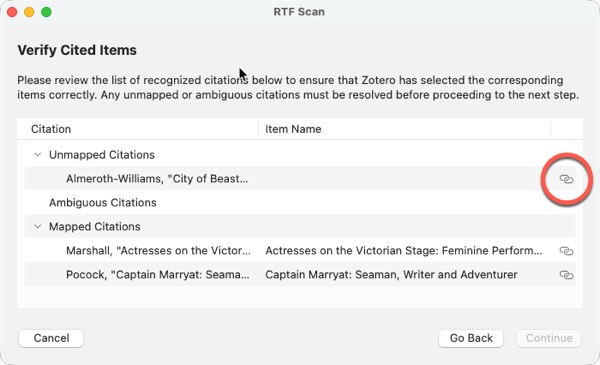
Once everything looks OK, click Continue.
Next, choose the referencing style you want for your final document and click Continue. Zotero scans through and replaces those curly-braced placeholders with proper citations in the output file you specified.
Your citations appear in footnotes and the bibliography is automatically generated at the end 💃🏽
Conclusion
Unfortunately, your output file won’t be linked to your Zotero Library, so you’d have to manually add or edit further citations. Another problem is that this method can’t differentiate between multiple publications by the same author in the same year. You’d have to unravel those problems when you run RTF Scan in Zotero and link the placeholders to the correct publication.
I think this method works best right at the end of your project. You’ve finished the writing and want to add all the citations in one go. It’s less effective if you’re pinging back and forth between Scrivener and Word.
To summarise on RTF Scan:
- ✅ Final drafts
- ✅ Batch citation addition
- ❌ Ongoing editing
- ❌ Collaborative documents
💡 If you make sure your Zotero library is clean - i.e. correct information and no duplicates - you’ll make life much easier for yourself.
As I’ll explain in the next post, there are more sophisticated approaches that give you better control in that final document. However, they are complicated and fragile. Currently, I think the RTF Scan approach offers the best combination of ease and reliability.
If Zotero is already open but not in the foreground, the Scrivener shortcut may not bring it to the front. You’ll need to click on Zotero in the dock the first time. ↩︎
To keep this simple, I’m not going to cover inline citations. And, no, I haven’t missed the irony of adding a footnote about footnotes. ↩︎