One of the many advantages of Helm is that it gives you a one-command installation method for many popular apps. It would take a while to create all the necessary Pods, Services, and ConfigMaps manually.
In this tutorial, I’ll guide you through a two-step process for installing WordPress with Helm. Although this isn’t necessarily something you’d want to do in the real world, it’s good for understanding the basics. I was very excited when I first got this working.
👉 Update (November 2025): This tutorial was originally published in 2022. Helm is now at version 3.18, and the Bitnami installation commands have been updated below to reflect current best practices.
To follow the steps, you’ll need:
- minikube
- kubectl
- Helm
If you’ve not used Helm before, please read my previous post first.
Step 1 - Install the Helm Chart
First, start minikube with minikube start.
For this demo, we’ll use Bitnami’s WordPress Helm Chart from their OCI registry.
Install the WordPress chart directly from the OCI registry with the following command:
helm install my-blog oci://registry-1.docker.io/bitnamicharts/wordpress
Let’s take a look at what Helm deployed for us with the kubectl get all command:
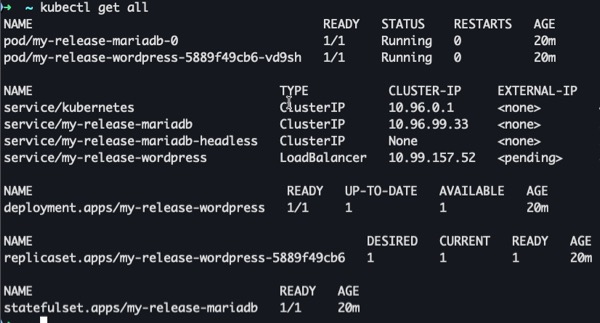
You’ll see that the WordPress chart created several Kubernetes resources:
- Two Pods: one for WordPress and one for MariaDB (the database)
- Three Services: for the Kubernetes API, MariaDB, and WordPress (including a headless service for MariaDB)
- One Deployment: managing the WordPress pod
- One ReplicaSet: maintaining the desired number of WordPress replicas
- One StatefulSet: managing the MariaDB database with persistent storage
Unlike the simple NGINX example, WordPress is more complex - it includes both the WordPress application and a MariaDB database, each with its own configuration and storage requirements.
This demonstrates one of Helm’s key advantages: it can deploy and configure multiple interconnected services with a single command.
Step 2 - Access your WordPress site
To access your WordPress site, run the following command:
minikube service my-blog-wordpress
This displays the URL where WordPress is accessible. Copy the first HTTP URL and paste it into your browser. You should see your WordPress site.

If you’ve used WordPress before, you’ll know you need to append /wp-admin to the URL to access the backend. The username is user, but you’ll need to extract the password from a Kubernetes secret. Copy and paste the following command to display your login credentials:
echo Password: $(kubectl get secret --namespace default my-blog-wordpress -o jsonpath="{.data.wordpress-password}" | base64 -d)
Replace my-blog-wordpress with your release name if you chose something different.
The command retrieves and decrypts the Kubernetes secret for you:
Now you have full access to your WordPress site 🎉
To clean up, run:
helm delete my-blog
Replace my-blog with the name of your release. If you’ve forgotten the name, use the helm list command to see everything that’s running.
You should then see a message confirming that release "my-blog" uninstalled.
Then stop minikube with minikube stop.
Conclusion
In this tutorial, you’ve seen how Helm can help you install Kubernetes-based apps. Thanks to the Helm Chart, you had everything you needed to run WordPress locally: three Services, a Deployment, a ReplicaSet, and a StatefulSet.
Of course, it would be overkill to use Kubernetes for a simple WordPress site. If you wanted a local copy without installing everything, it would make more sense to use Docker Compose. However, hopefully this gave you a familiar example for understanding Helm.
To keep it simple, we just used all the default values. If you’re eager to start tinkering, take a look at the Chart page to see what you can configure. Warning: it’s addictive.