One of my first tasks as a technical writer was to document a Kubernetes-based release orchestration tool. Not daunting at all. At that time, I could provide a vague description of Kubernetes, but hadn’t the foggiest idea what it actually looked like. There aren’t many opportunities in life to just play with a Kubernetes cluster - at least, not without spending thousands of dollars on AWS.
Fortunately, I discovered minikube, a free solution for installing a single-node cluster Kubernetes on your local machine. With this setup, I’ve been able to experiment with various products and projects. Thanks to a couple of clever add-ons, you can even simulate load balancers and DNS servers, too.
👉 Note: This tutorial was originally written in 2022. I’ve updated the instructions to reflect current best practices. If you’re using an older version of minikube or previously used Hyperkit, the Docker driver is now the recommended approach for macOS users.
In this post, I’ll explain how to set up minikube and run your first simple Kubernetes deployment.
Installing and Configuring minikube
Alongside minikube, you’ll also need a couple of other tools.
minikube
First, download minikube for your platform. It’s currently available for macOS, Linux, and Windows. If you’re using a Mac and Homebrew you can install it by typing brew install minikube at the command line. Windows users can use the command choco install minikube with Chocolatey.
Docker
To run minikube, you’ll need a container or virtual machine manager. The Docker driver is now the recommended option for macOS users. If you already have Docker Desktop installed, you’re ready to go. Otherwise, install it with:
- On macOS, use the Homebrew command
brew install --cask docker - Alternatively, download Docker Desktop for free from docker.com
After installation, launch Docker Desktop to ensure the Docker daemon is running.
kubectl
kubectl (pronounced cube-control), provides command-line access to your Kubernetes cluster. There are a few installation options:
- On macOS, use the Homebrew command
brew install kubectl. - On Windows, use the Chocolatey command
choco install kubernetes-cli. - Follow the instructions for your OS in the kubectl documentation.
To check kubectl is installed, run kubectl version at the command line.
Once you’ve got minikube, Docker, and kubectl, you’re ready.
At the command line, type:
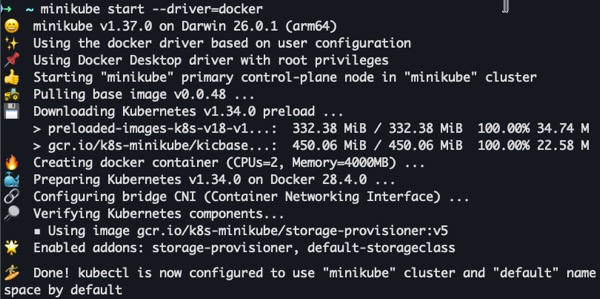
minikube start --driver=docker
The first time you do this, it’ll be sloooow. Make yourself a cup of tea while it downloads and installs Kubernetes. Subsequent startups will be a lot faster.
If you want to limit how much memory minikube can use, you can add flags like --memory=4096 or --cpus=2 to the start command.
Eventually, you’ll see some jaunty emojis to show that minikube is up and running. You have a Kubernetes cluster called minikube.
Creating a Kubernetes Deployment
Pods are the smallest unit of work on Kubernetes. Although you can create pods individually, deployments give you more control. The Kubernetes deployment object lets you:
- Deploy a replica set or pod.
- Update pods and replica sets.
- Roll back to previous deployment versions.
- Scale a deployment.
- Pause or continue a deployment.
In short, a Kubernetes deployment ensures the desired number of pods are running and available at all times.
The best way to create a Kubernetes deployment is declaratively with a YAML file. That way, your deployment is fully documented and (hopefully) stored in version control.
While you’re getting started, though, it’s much more fun to be imperative and issue a command.
Type the following command to create your deployment:
kubectl create deployment my-deploy --image=catherinepope/my-web:latest
This command creates a Kubernetes deployment called my-deploy, running one pod with an Docker image called catherinepope/my-web. This image simply displays a random picture from Picsum. You can substitute it with a Docker image of your own.
Although Kubernetes tells you the deployment is created, there’s not a lot to see. Hmm, not impressive so far.
To get more confirmation of your deployment, use: kubectl get deploy.
And you can take a peek at your pod with: kubectl get pod.

There’s your solitary pod. As it’s part of a deployment, its name is generated automatically and prefixed with the deployment name.
To make your deployment visible as a web app, you need to expose it as a service.
Exposing a Kubernetes Service
The default Kubernetes service type is ClusterIP, which means your Pods are visible only within the cluster. That’s not much good if you want to run a web app. To make your application publicly available, you need a NodePort service.
Here’s the command:
kubectl expose deployment my-deploy --port 80 --name my-deploy-np --type NodePort
The port is the port exposed on my image. If you’re using a different image, the port should be available in the documentation. If you’ve already pulled the image, you can discover the port with the following command:
docker inspect --format='{{.Config.ExposedPorts}}' catherinepope/my-web

This command uses a Go template to extract the port information from the Docker image’s configuration.
With the Docker driver, accessing your service requires creating a tunnel. The simplest way is to run:
minikube service my-deploy-np
This automatically opens your web app in your default browser. The terminal needs to stay open to maintain the connection to the service.
Alternatively, if you want to see the URL without opening the browser, use:
minikube service my-deploy-np --url
Then visit the displayed URL (e.g., http://127.0.0.1:xxxxx) in your browser while keeping the terminal window open.
Monitoring Your Deployment with the minikube Dashboard
Although you can get a lot of information with kubectl commands, a more visual tool is helpful when you’re getting started. Prepare to be amazed (or at least moderately pleased) by the minikube dashboard. At the command line, type:
minikube dashboard
Wait a few moments, and the dashboard should open automatically in your default browser. If that doesn’t happen, you should at least see a link in your terminal:
You’ll get real-time information about your cluster. Also, you can tinker with your deployment and have a good look at what’s happening behind the scenes.

The dashboard itself is simply a Kubernetes pod, which you can see by switching to the kubernetes-dashboard namespace.
Namespaces are a way of isolating groups of resources within a cluster. In this case, it’s keeping all the Kubernetes mechanisms where we can’t accidentally delete them.
Let’s scale things up so you can see what happens in the dashboard. At the command line type:
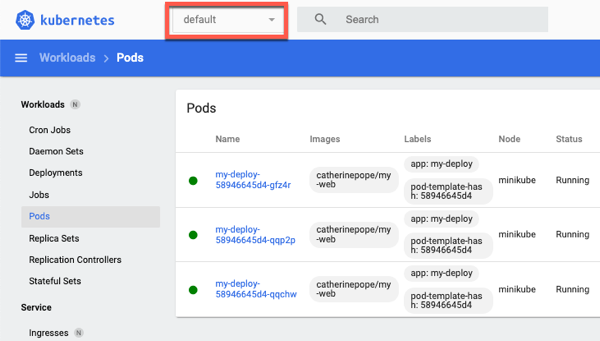
kubectl scale --replicas 3 deployment my-deploy
Do this in a new terminal window if you want to keep the dashboard running.
Hopefully, you’ll now have three pods bobbing around in the dashboard (make sure you’ve selected default from the namespace drop-down at the top).
Conclusion
That’s a quick canter through a simple Kubernetes deployment. If you’ve finished for now, here are the steps for cleaning up:
- Delete your deployment:
kubectl delete deployment my-deploy. - Delete your service:
kubectl delete service my-deploy-np. - Stop minikube:
minikube stop.
In a future post, I’ll explain how you can use minikube with Helm for more complex Kubernetes deployments. And we’ll look at a declarative Kubernetes manifest, too.
Last updated: November 2025