I’ve used a few different MacBooks over the last couple of years. Although the M2 offered a big performance boost over the M1, I noticed a couple of downsides. Firstly, the way the M2 handles external drives; secondly, my network connectivity repeatedly slowing down and dropping. These problems disappeared when I briefly had an M3 through work, but returned when I switched back to an M2. My network connection would suddenly drop for no apparent reason. The internet connection itself was fine, but my Mac hadn’t got the memo. It turns out, my MacBook was connecting to the slower, more congested 2.4GHz network instead of the faster 5GHz band.
In this post, I’ll explain the solution I implemented. Although your setup will be different, hopefully these steps will at least give you a steer towards what might work for you.
The Problem
Why is this happening? Haven’t we got enough to deal with in 2025?
Many modern routers broadcast networks on two frequencies: 2.4GHz and 5GHz. The 2.4GHz wavelength is often used by smaller wi-fi enabled devices, like fitness trackers. This means this network is busy, with lots of devices competing for resources. The advantage of this lower frequency is that it travels much better, giving you wider coverage, but it carries less information.
The 5GHz wavelength is operating at a higher frequency and carries more information, but its reach is smaller and it struggles to penetrate obstacles like walls and ceilings.
To use a musical analogy, it’s like guitar strings 🎸 If you “fret” your Wi-Fi network to 5GHz, you’re shortening your string to achieve a higher note that doesn’t carry as far. The 2.4GHz “fret” produces deeper notes that resonate throughout the whole building.
In short, if your MacBook can connect to 5GHz, you’ll get much faster speeds. But unless it’s close enough to your router to receive a strong 5GHz signal, it’ll default to the slower but more reliable 2.4GHz network, where there’s a lot more competition.
The Solution
It used to be possible to force your MacBook to use the 5GHz frequency. The instructions I found in discussion forums no longer work (this seems to be the result of a recent macOS upgrade).
The simplest solution is to either position your MacBook closer to the router so it can “hear” the 5GHz frequency, or to connect with an ethernet cable. For many of us, though, that means either working on the sofa or trailing wires through the house. This is an effective temporary solution, but you probably want something more flexible.
Here’s the solution I adopted.
Step 1: Get a Wi-Fi repeater
A network repeater sits between your router and the areas with weak signal, catching the Wi-Fi signal and rebroadcasting it further into your home. There are several types of Wi-Fi repeater:
- Standalone units look like small routers and sit on a surface. They’re typically powerful, with external antennas for better range. They often also include Ethernet ports so you can connect devices through cables as well as Wi-Fi. These work well for larger homes or when you need to support multiple devices in the extended coverage area.
- Plug-in models are compact units that you plug directly into a wall socket. Despite their small size, they contain the same Wi-Fi technology as larger units, with antennas hidden inside the casing. They’re discreet and don’t take up any space, making them ideal for smaller homes or if you just need to boost the signal to one specific area.
- Mesh systems are a little ecosystem. Instead of one main router and one repeater, you get multiple identical units that work together as a unified network. You place them around your home, and they create seamless coverage with automatic handoff between units as you move around.
My router is a FRITZ!BOX 7530 AX, so I chose a FRITZ! Repeater 3000. I placed the repeater in the room directly above the router, which is also next door to my MacBook workspace. I now achieve a much stronger signal throughout the house. Although this standalone repeater cost around £200, that’s cheaper than buying a plug-in model for every room.
FRITZ! devices operate on a Mesh system, so it was very easy and took about two minutes to set up.1
There was one more step needed to make my MacBook reliably connect to the 5GHz network.
Step 2 - Split the network
I’ll admit, this step terrified me 😳 Although I’m nerdy, I’ve never felt tempted to muck about with my router settings. However, it was more straightforward than I expected.
⚠️ One caveat, though: your router is likely to be different. Once you understand the principle, it’s important to research the solution for your specific model.
As I mentioned earlier, your router already broadcasts a 5GHz signal, but your MacBook is defaulting to 2.4GHz. The answer is to create separate networks, then connect directly to the 5GHz version.
In my router settings (under Wi-Fi > Wi-Fi Network), there’s a checkbox to set separate names for the two frequencies:
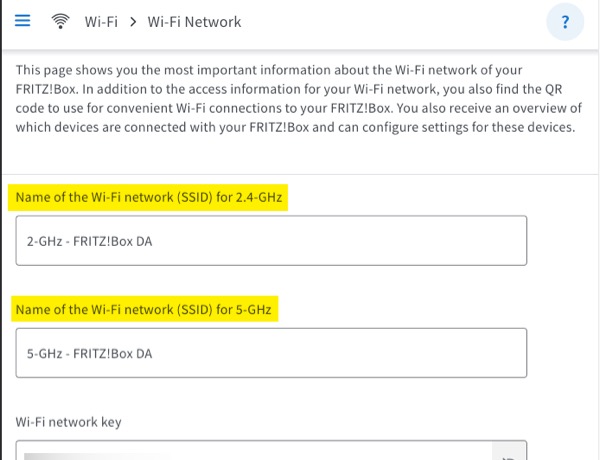
I labelled them 2.4GHz and 5GHz, then restarted my router. Then I was able to connect directly to the 5GHz network from my MacBook.
Before this split, my MacBook was making the decision. From now on, my MacBook will only connect to 2.4GHz if I ask it to.
Conclusion
You could split the network without getting a repeater, but you’d likely find the 5GHz connection drops frequently when you’re far from the router. The combination of repeater and network splitting completely solved the problem for me, giving me reliable high-speed internet throughout my home. I really hope it helps you, too.
I’m not affiliated in any way with FRITZ! - these are just the products that suit my needs. ↩︎